3D Printer/Prusa MINI
Prepare Printer
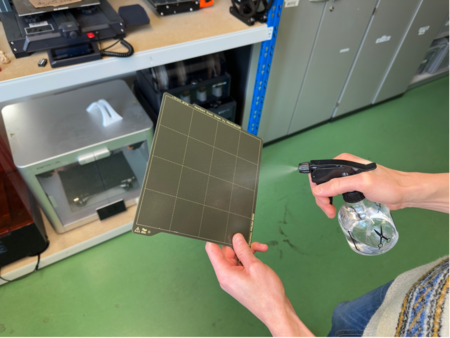
- First clean the magnetic steel sheet. To do so pull it up on the two front edges and spray a few times with isopropyl alcohol on it.
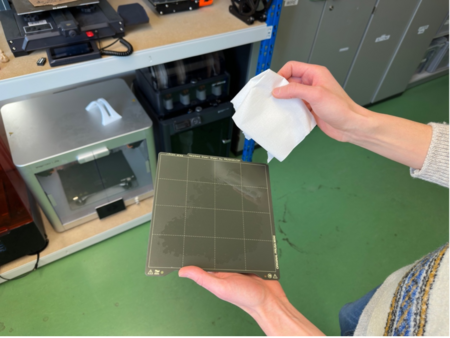
- Wipe it up with a paper towel.
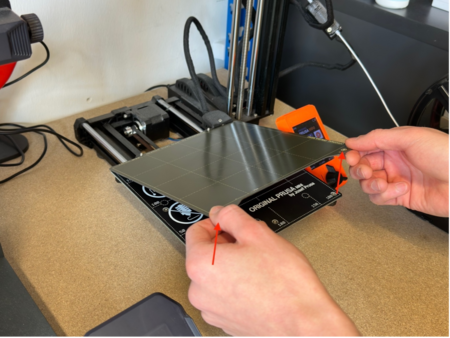
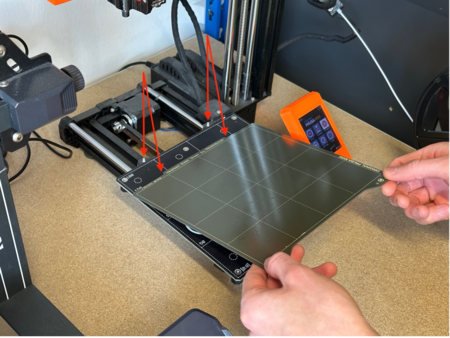
- Place back the steel sheet.


Change Filament
- First you will have to unload the current filament. To do so go to “Filament” and then “Unload Filament”.
- After a while the printer will start unloading the filament. Half of the filament which is in the tube will be ejected by the printer. Please pull out the remaining filament gently.
- You can find PLA filament above the printers. Please ask if you are unsure whether you can use a filament.
- Please make sure that you use PLA (type of filament)!
- Cut the tip of your filament (the one you want to use) at a 45-degree angle before inserting it into the printer.
- Before loading the filament, insert it by pushing it gently trough the tube (approximately half of it) until you feel resistance.
- To load the filament, go to “Filament”, “Load Filament” and then select “PLA 215/60”.
- Press “CONTINUE” and push the filament gently until the printer starts pulling it.
- You will be asked whether the filament is extruding and with the correct color. Press “YES” if everything is fine and “NO” to extrude more filament. If you press on “RETRY” the printer will unload the filament and you will have to repeat the steps 2-8.
- Remove the extruded filament from the nozzle and the steel sheet.
Set up PrusaSlicer
- To use the printer, you will need an application which converts the 3d model into a file that can be interpreted by the printer.
- Visit https://www.prusa3d.com/page/prusaslicer_424/ and download the application for your OS.

- After that open the app and follow the instructions to set it up.
- Remove profiles if you had used the app before and do want to setup new ones. Click on Next >.

- Skip this step as you do not need a profile for using this application and click on Next >.

- Please select only the sources from Prusa and click on Next >.

- Scroll down to MK3 Family and select Original Prusa i3 MK3S & MK3+ 0.4 mm nozzle.

- Then scroll down to Legacy profiles Family, select Original Prusa MINI & MINI+ 0.4 mm nozzle and click on Next >.

- We do not have those printers, just click on Next >.

- Unselect the checkbox and click on Next >.

- Make sure that Generic PLA is selected and click on Next >.

- Please skip automatic updates and click on Next >.

- Select build-in downloader if you want to open models from printables.com and click on Next >.

- Select this checkbox if you want to export full pathnames and part sources into your 3mf files. Then click an Next >.

- Select Export mode to see the whole settings in the app and click on Finish.

- Now an empty project will be created where you can add your model. Select "0.20mm QUALITY" from the dropdown of "Print settings".
- Set "Filament" to "Generic PLA".
- Select the printer you are using. In this case select "Original Prusa MINI & MINI+"


Your first print with Prusa MINI
- Make sure you have installed the PrusaSlicer application before continuing. If not please do all necessary steps in chapter Set up PrusaSlicer.
- The project can be found on the USB sticks / SD cards in each printer. For this printer the correct project is located under “empty_projects/PRUSA_MINI”. Download the file onto your computer.
- Before adding your 3D model, please make sure that it is saved in one of these two formats: 3mf or stl. Note that this step has to be done with your modeling application you use.

- Open the file as a project in the PrusaSlicer application and place your 3D model using drag & drop.
- Now you can correct the position, rotation and scale of your models. Please make sure all models are placed on the plate.
- Add supports if needed.
- Select the infill in percent. The more infill, the more stable the pressure, but the heavier it is.
- Go to the tab “Print Settings” if you want to change the infill pattern:
- If you think that everything is as you want it, click on “Slice now”.
- Here you can see how much filament is needed and how long the print will take.
- Check whether everything is fine and export the G-code. You may encounter a warning about using a binary gcode. Ignore it and proceed with the next steps.
- Save the created file on the USB stick.
- As soon as you insert the USB stick into the printer, all files on the USB stick will be displayed (go to “Print” if not). The newest file will appear in the top of the list. A preview will be shown to you so you can make sure to print the right file.
- It can happen that the printer does not show you all files that are on the USB stick. Just pull out the USB stick, check on your computer whether all files are there and insert the USB stick into the printer again.
- Before you start the print, please make sure that you use PLA (type of filament)! Check for that chapter Change Filament. Also make sure that the the printer has enough filament. This is important as this printer does not have a sensor to tell you that it ran out of filament.
- Please observe the first 3 layers of the print.
- This printer has a sensor which tells you if it runs out of filament and stops the printing if so.
- After that the printer will automatically unload the remaining filament and ask you whether it was successful.
- Insert a new filament to continue printing. As soon as you insert the filament a “CONTINUE” button will appear.
- When you press on “CONTINUE”, the printer will start purging the new filament and asks you whether the color is correct.
- Before pressing on “YES”, please make sure, that the plate and the nozzle are clear. Otherwise, the print can fail as the printer will immediately continue printing.
- When the print is finished, wait a moment before picking up the print as the steel sheet is still hot. To pick it up, lift the steel sheet and bend the plate slightly to remove the printed parts from it.
- Please remove the remaining filament that is stuck to the steel sheet.
