3D Printer/Prusa I3 MK3: Difference between revisions
Jump to navigation
Jump to search
No edit summary |
No edit summary |
||
| Line 8: | Line 8: | ||
== Change Filament == | == Change Filament == | ||
# First you will have to unload the current filament. To do so go to | # First you will have to unload the current filament. To do so go to '''unload filament''' and then select '''PLA - 215/60'''. | ||
# Wait until the nozzle and the heatbed have reached the set temperature. A loud noise will be heard. | # Wait until the nozzle and the heatbed have reached the set temperature. A loud noise will be heard. | ||
# Press the knob and gently pull out the filament. | # Press the knob and gently pull out the filament. | ||
# You can find PLA filament above the printers. Please ask if you are unsure whether you can use a filament. | # You can find PLA filament above the printers. Please ask if you are unsure whether you can use a filament. | ||
# Please make sure that you use | # Please make sure that you use '''PLA''' (type of filament)! | ||
# Cut the tip of your filament (the one you want to use) at a 45-degree angle before inserting it into the printer. | # Cut the tip of your filament (the one you want to use) at a 45-degree angle before inserting it into the printer. | ||
# Before loading the filament, insert it by pushing it gently from above into the nozzle. | # Before loading the filament, insert it by pushing it gently from above into the nozzle. | ||
# To load the filament, go to | # To load the filament, go to '''Load filament'''. | ||
# Push the filament gently until the printer starts pulling it. | # Push the filament gently until the printer starts pulling it. | ||
# You will be asked whether the filament is extruding and with the correct color. Press | # You will be asked whether the filament is extruding and with the correct color. Press '''Yes''' if everything is fine and '''No''' to extrude more filament. | ||
# Remove the extruded filament from the nozzle and the steel sheet. | # Remove the extruded filament from the nozzle and the steel sheet. | ||
== Set up PrusaSlicer == | |||
# To use the printer, you will need an application which converts the 3d model into a file that can be interpreted by the printer. | |||
# Visit https://www.prusa3d.com/page/prusaslicer_424/ and download the application for your OS. | |||
# After that open the app and follow the instructions to set it up. | |||
# Remove profiles if you had used the app before and do want to setup new ones. Click on '''Next >'''. | |||
# Skip this step as you do not need a profile for using this application and click on '''Next >'''. | |||
# Please select only the sources from Prusa and click on '''Next >'''. | |||
# Scroll down to MK3 Family and select '''Original Prusa i3 MK3S & MK3+ 0.4 mm nozzle'''. | |||
# Then scroll down to '''Legacy profiles Family''', select '''Original Prusa MINI & MINI+ 0.4 mm nozzle''' and click on '''Next >'''. | |||
# We do not have those printers, just click on '''Next >'''. | |||
# Unselect the checkbox and click on '''Next >'''. | |||
# Make sure that '''Generic PLA''' is selected and click on '''Next >'''. | |||
# Please skip automatic updates and click on '''Next >'''. | |||
# Select build-in downloader if you want to open models from printables.com and click on '''Next >'''. | |||
# Select this checkbox if you want to export full pathnames and part sources into your 3mf files. Then click an '''Next >'''. | |||
# Select '''Export mode''' to see the whole settings in the app and click on '''Finish'''. | |||
# Now an empty project will be created where you can add your model. Select '''0.20mm QUALITY''' from the dropdown of '''Print settings'''. | |||
# Set '''Filament''' to '''Generic PLA'''. | |||
# Select the printer you are using. In this case select '''Original Prusa i3 MK3S & MK3S+''' | |||
== Your first print with Prusa I3 MK3 == | |||
# | |||
Revision as of 16:41, 17 November 2025
Prepare Printer
- First clean the magnetic steel sheet. To do so pull it up on the two front edges and spray a few times with isopropyl alcohol on it.
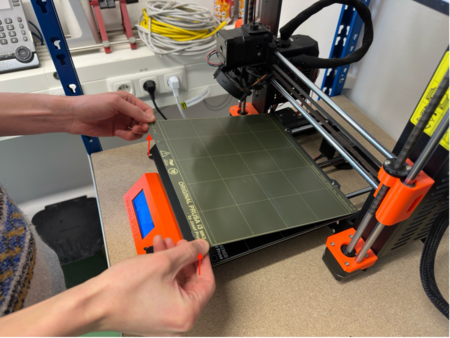

- Wipe it up with a paper towel.

- Place back the steel sheet.


Change Filament
- First you will have to unload the current filament. To do so go to unload filament and then select PLA - 215/60.
- Wait until the nozzle and the heatbed have reached the set temperature. A loud noise will be heard.
- Press the knob and gently pull out the filament.
- You can find PLA filament above the printers. Please ask if you are unsure whether you can use a filament.
- Please make sure that you use PLA (type of filament)!
- Cut the tip of your filament (the one you want to use) at a 45-degree angle before inserting it into the printer.
- Before loading the filament, insert it by pushing it gently from above into the nozzle.
- To load the filament, go to Load filament.
- Push the filament gently until the printer starts pulling it.
- You will be asked whether the filament is extruding and with the correct color. Press Yes if everything is fine and No to extrude more filament.
- Remove the extruded filament from the nozzle and the steel sheet.
Set up PrusaSlicer
- To use the printer, you will need an application which converts the 3d model into a file that can be interpreted by the printer.
- Visit https://www.prusa3d.com/page/prusaslicer_424/ and download the application for your OS.
- After that open the app and follow the instructions to set it up.
- Remove profiles if you had used the app before and do want to setup new ones. Click on Next >.
- Skip this step as you do not need a profile for using this application and click on Next >.
- Please select only the sources from Prusa and click on Next >.
- Scroll down to MK3 Family and select Original Prusa i3 MK3S & MK3+ 0.4 mm nozzle.
- Then scroll down to Legacy profiles Family, select Original Prusa MINI & MINI+ 0.4 mm nozzle and click on Next >.
- We do not have those printers, just click on Next >.
- Unselect the checkbox and click on Next >.
- Make sure that Generic PLA is selected and click on Next >.
- Please skip automatic updates and click on Next >.
- Select build-in downloader if you want to open models from printables.com and click on Next >.
- Select this checkbox if you want to export full pathnames and part sources into your 3mf files. Then click an Next >.
- Select Export mode to see the whole settings in the app and click on Finish.
- Now an empty project will be created where you can add your model. Select 0.20mm QUALITY from the dropdown of Print settings.
- Set Filament to Generic PLA.
- Select the printer you are using. In this case select Original Prusa i3 MK3S & MK3S+