Piezo Speaker: Difference between revisions
Jump to navigation
Jump to search
Created page with "= How to control it in MicroPython = If you want to add higher notes see https://en.wikipedia.org/wiki/Piano_key_frequencies for the needed frequency. Example code shows how y..." |
mNo edit summary |
||
| (17 intermediate revisions by 3 users not shown) | |||
| Line 1: | Line 1: | ||
= Description = | |||
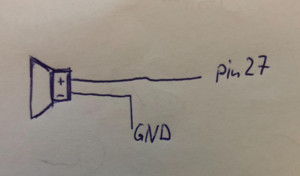
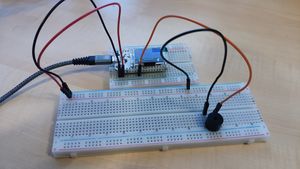
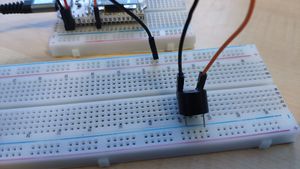
A Piezo-Speaker has two connectors and can generate sounds if you apply a frequency. One is + and one is -. If you connect it to the ESP + is connected to the Pin and - to GND. | |||
With the speaker in the LMUBox the long Pin is +. | |||
[[file:Piezo_Speaker_close_up.jpg|x200px]] | |||
[[File:Piezospeaker.PNG|x200px]] | |||
[[File:Piezospeaker1.PNG|x200px]] | |||
= How to connect it electrically = | |||
[[File:Piezzo.PNG|300px]] | |||
= How to control it in MicroPython = | = How to control it in MicroPython = | ||
If you want to add higher notes see https://en.wikipedia.org/wiki/Piano_key_frequencies for the needed frequency | |||
== Basic code to generate a 500 Hz signal == | |||
<syntaxhighlight lang="python" line='line'> | |||
from machine import Pin | |||
from time import sleep, sleep_us, sleep_ms | |||
# assume our speaker is connected to Pin 27, we use it as output | |||
myLED = Pin(27, Pin.OUT) | |||
#generate a 500Hz on/off signal | |||
while True: | |||
# this switcheson for 1ms = 1000 us | |||
myLED.on() | |||
sleep_us(1000) | |||
# this switches off for 1 ms = 1000 us | |||
myLED.off() | |||
sleep_us(1000) | |||
</syntaxhighlight> | |||
== Code to play a melody - decoding notes == | |||
Example code shows how you can play a melody with the speaker. If you want to add higher notes see https://en.wikipedia.org/wiki/Piano_key_frequencies for the needed frequency. The example code was taken and edited from https://micropython-on-esp8266-workshop.readthedocs.io/en/latest/basics.html#beepers. | |||
There are some issues with restarting PWM outputs - see [[Known Issues]]. | |||
<syntaxhighlight lang="python" line='line'> | <syntaxhighlight lang="python" line='line'> | ||
| Line 32: | Line 65: | ||
beeper.deinit() | beeper.deinit() | ||
</syntaxhighlight> | </syntaxhighlight> | ||
[[file:Piezo_Speaker.jpg|300px]] | |||
[[file:Piezo_Speaker_close_up.jpg|300px]] | |||
= Related Tutorial Videos = | |||
<youtube>HPQMvL1SP_c</youtube> | |||
[[Category:Actuators]] | |||
Latest revision as of 09:31, 14 June 2024
Description
A Piezo-Speaker has two connectors and can generate sounds if you apply a frequency. One is + and one is -. If you connect it to the ESP + is connected to the Pin and - to GND. With the speaker in the LMUBox the long Pin is +.
How to connect it electrically
How to control it in MicroPython
Basic code to generate a 500 Hz signal
from machine import Pin
from time import sleep, sleep_us, sleep_ms

# assume our speaker is connected to Pin 27, we use it as output
myLED = Pin(27, Pin.OUT)

#generate a 500Hz on/off signal
while True:
      # this switcheson for 1ms = 1000 us
      myLED.on()
      sleep_us(1000)
      # this switches off for 1 ms = 1000 us
      myLED.off()
      sleep_us(1000)
Code to play a melody - decoding notes
Example code shows how you can play a melody with the speaker. If you want to add higher notes see https://en.wikipedia.org/wiki/Piano_key_frequencies for the needed frequency. The example code was taken and edited from https://micropython-on-esp8266-workshop.readthedocs.io/en/latest/basics.html#beepers.
There are some issues with restarting PWM outputs - see Known Issues.
# beeper code from https://micropython-on-esp8266-workshop.readthedocs.io/en/latest/basics.html#beepers
from machine import Pin, PWM
from time import sleep

tempo = 4
#notes and corresponding frequency
tones = {
    'c': 262,
    'd': 294,
    'e': 330,
    'f': 349,
    'g': 392,
    'a': 440,
    'b': 494,
    'C': 523,
    ' ': 0,
}
pin = Pin(27, Pin.OUT)
# Init Beeper without frequency.
beeper = PWM(pin, duty=512)
melody = 'cdefggaaaagaaaagffffeeddddc'
rhythm = [8, 8, 8, 8, 4, 4, 8, 8, 8, 8, 4, 8, 8, 8, 8, 4, 8, 8, 8, 8, 4, 4, 8, 8, 8, 8, 4]

for tone, length in zip(melody, rhythm):
    beeper.freq(tones[tone])
    sleep(tempo/length)

beeper.deinit()
Related Tutorial Videos


